
How to use this page
- Work through Tasks 1–4 and tick each step as you complete it. Your progress and answers are saved in this browser automatically.
- Wherever you see
 Screenshot, capture your lab progress and attach the screenshot right on this page. Add a short explanation for each.
 - Answer the Task 5 questions, then use Print / Save as PDF to export your answers and screenshots as one submission file.
- Remember to delete your lab resources after capturing everything.
Lab Objectives and Architecture reference
Lab scenario: in this lab, you create and compare virtual machines to virtual machine scale sets. You learn how to create, configure and resize a single virtual machine. You learn how to create a virtual machine scale set and configure autoscaling.
In this lab, you will:
- Task 1 — Deploy zone-resilient Azure virtual machines by using the Azure portal 10 pts
- Task 2 — Manage compute and storage scaling for virtual machines 20 pts
- Task 3 — Create and configure Azure Virtual Machine Scale Sets 20 pts
- Task 4 — Scale Azure Virtual Machine Scale Sets 30 pts
- Task 5 — Summary Questions & Review 20 pts
You will build this topology across Tasks 1–4.
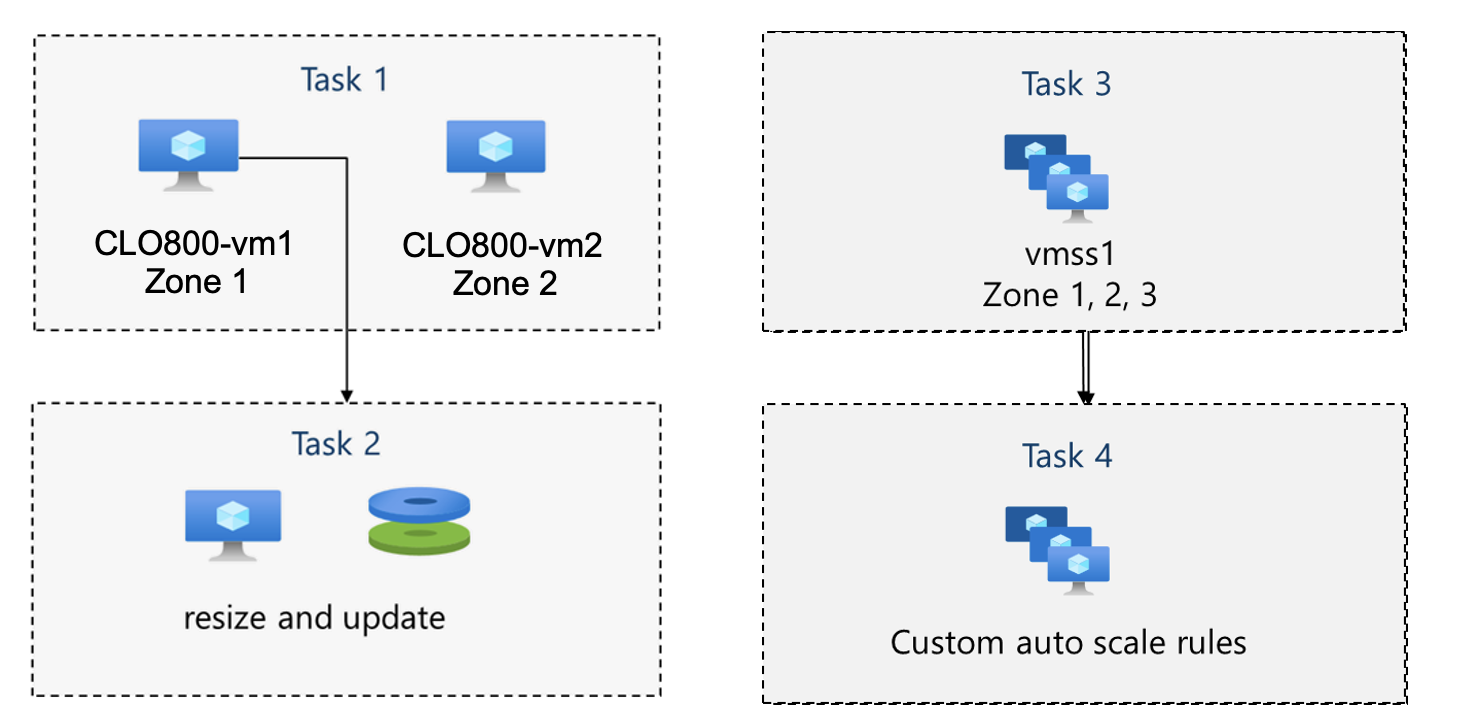
Task 1: Deploy zone-resilient Azure virtual machines by using the Azure portal 10 pts
In this task, you will deploy two Azure virtual machines into different availability zones by using the Azure portal. Availability zones offer the highest level of uptime SLA for virtual machines at 99.99%. To achieve this SLA, you must deploy at least two virtual machines across different availability zones.
-
Note: This will deploy two virtual machines in the selected region, one in each zone. You achieve the 99.99% uptime SLA because you have at least two VMs distributed across at least two zones. In the scenario where you might only need one VM, it is a best practice to still deploy the VM to another zone.
-
Setting Value Subscription the name of your Azure subscription Resource group <yourName>-clo800-F67-rgVirtual machine names <yourName>-clo800-F67-vm1and<yourName>-clo800-F67-vm2(After selecting both availability zones, select Edit names under the VM name field.)Region East US Availability options Availability zone Availability zone Zone 1, 2 (read the note about using virtual machine scale sets) Security type Standard Image Windows Server 2019 Datacenter - x64 Gen2 Azure Spot instance unchecked Size Standard D2s v3 Username localadmin Password Provide a secure password Public inbound ports None Would you like to use an existing Windows Server license? Unchecked -
Setting Value OS disk type Standard HDD Delete with VM checked (default) Enable Ultra Disk compatibility Unchecked -
Setting Value Delete public IP and NIC when VM is deleted Checked Load balancing options None -
Setting Value Patch orchestration options Azure orchestrated -
Setting Value Boot diagnostics Disable -
Note: Notice as the virtual machine deploys the NIC, disk, and public IP address (if configured) are independently created and managed resources.
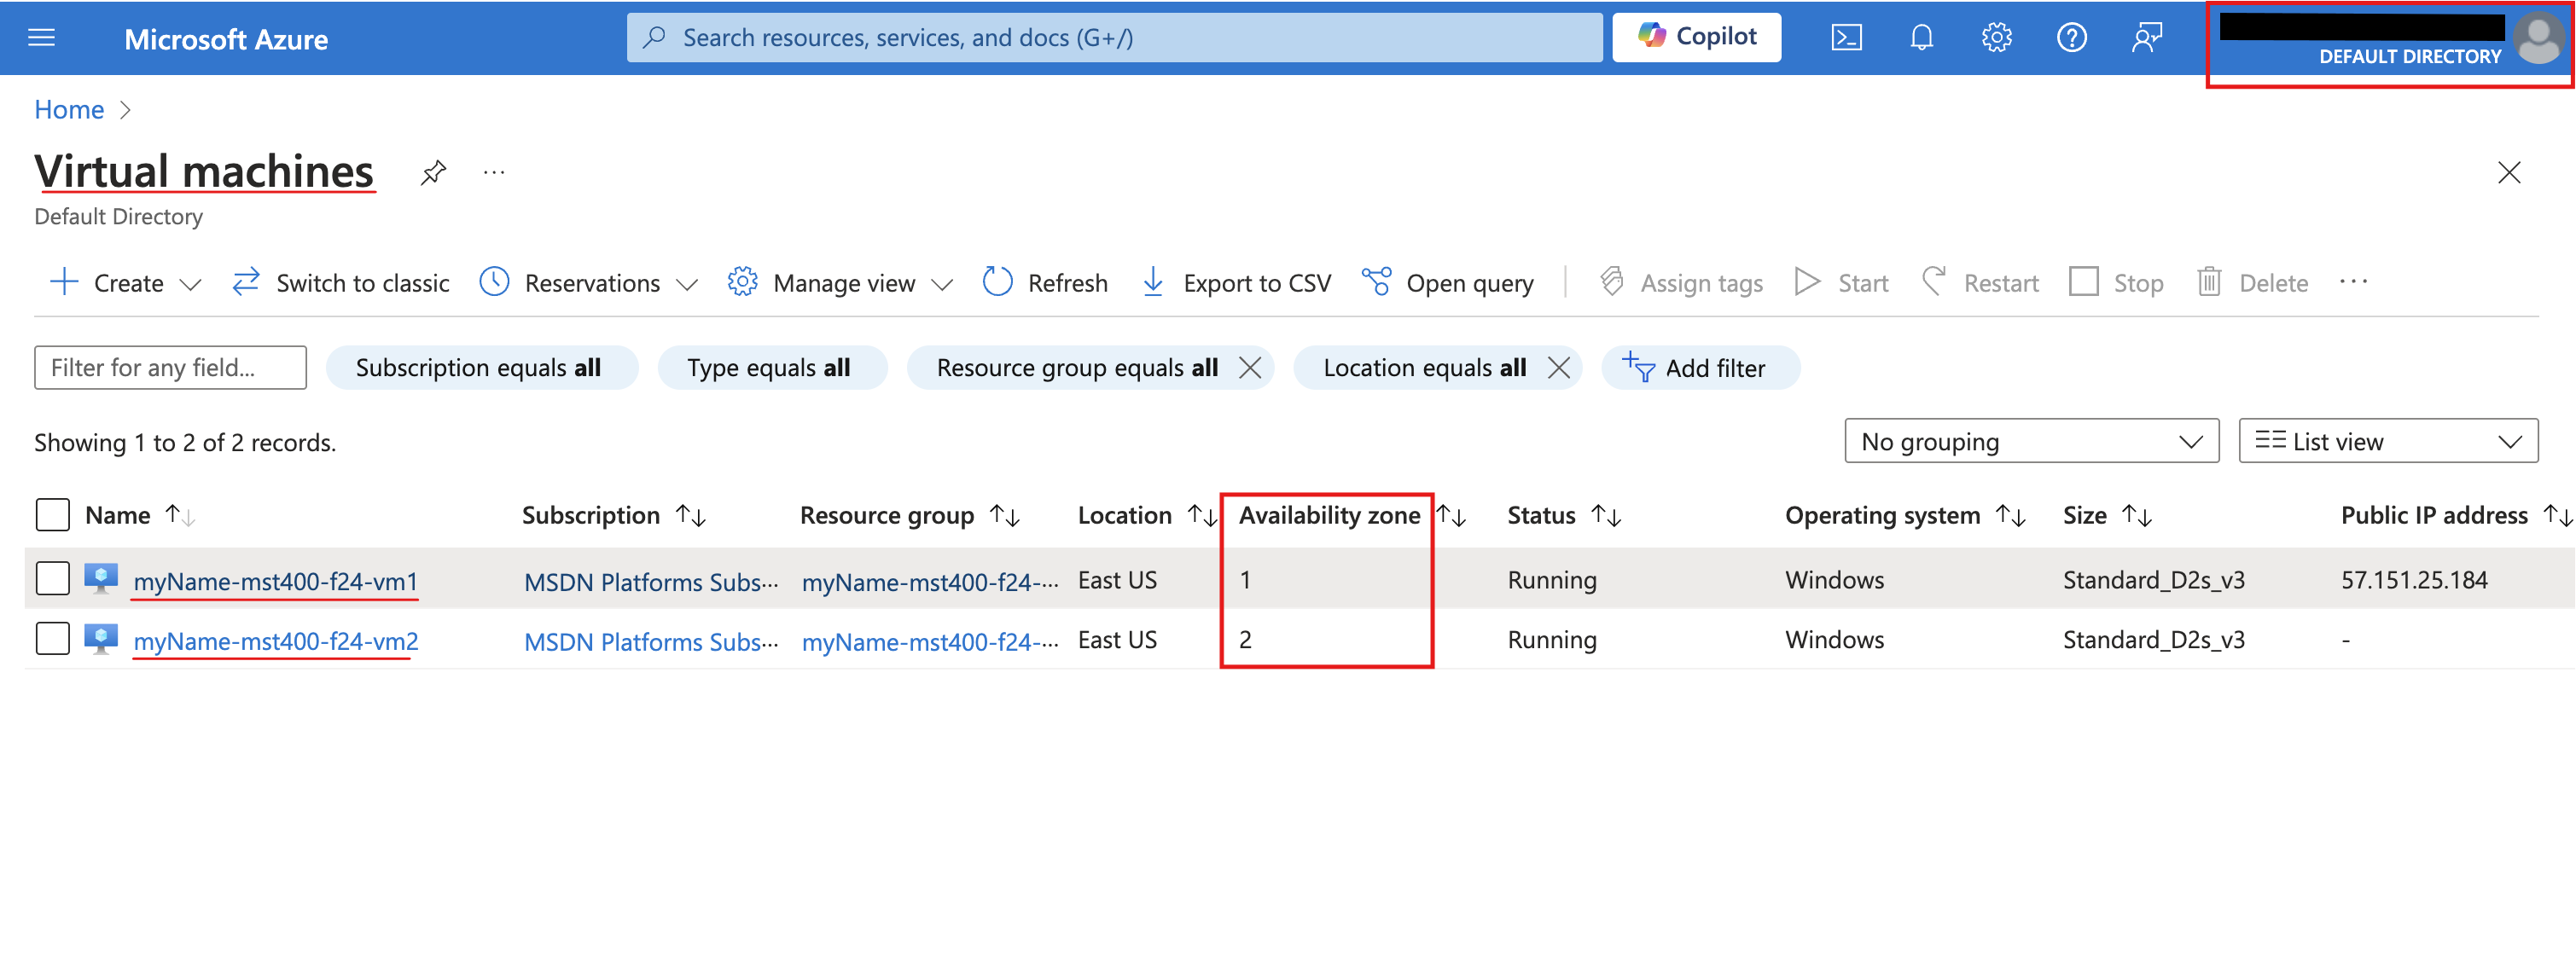
- Screenshot must show your Odl_user account, the completed deployment of <yourName>-clo800-F67-vm1 and <yourName>-clo800-F67-vm2 in Zones 1 and 2
Task 2: Manage compute and storage scaling for virtual machines 20 pts
In this task, you will scale a virtual machine by adjusting its size to a different SKU. Azure provides flexibility in VM size selection so that you can adjust a VM for periods of time if it needs more (or less) compute and memory allocated. This concept is extended to disks, where you can modify the performance of the disk, or increase the allocated capacity.
-
Note: Choose another size if Standard DS1_v2 is not available. Resizing is also known as vertical scaling, up or down.
-
Setting Value Disk name vm1-disk1Storage type Standard HDD Size (GiB) 32 -
Note: Detaching removes the disk from the VM but keeps it in storage for later use.
-
Note: The Overview blade also provides performance and usage information for the disk.
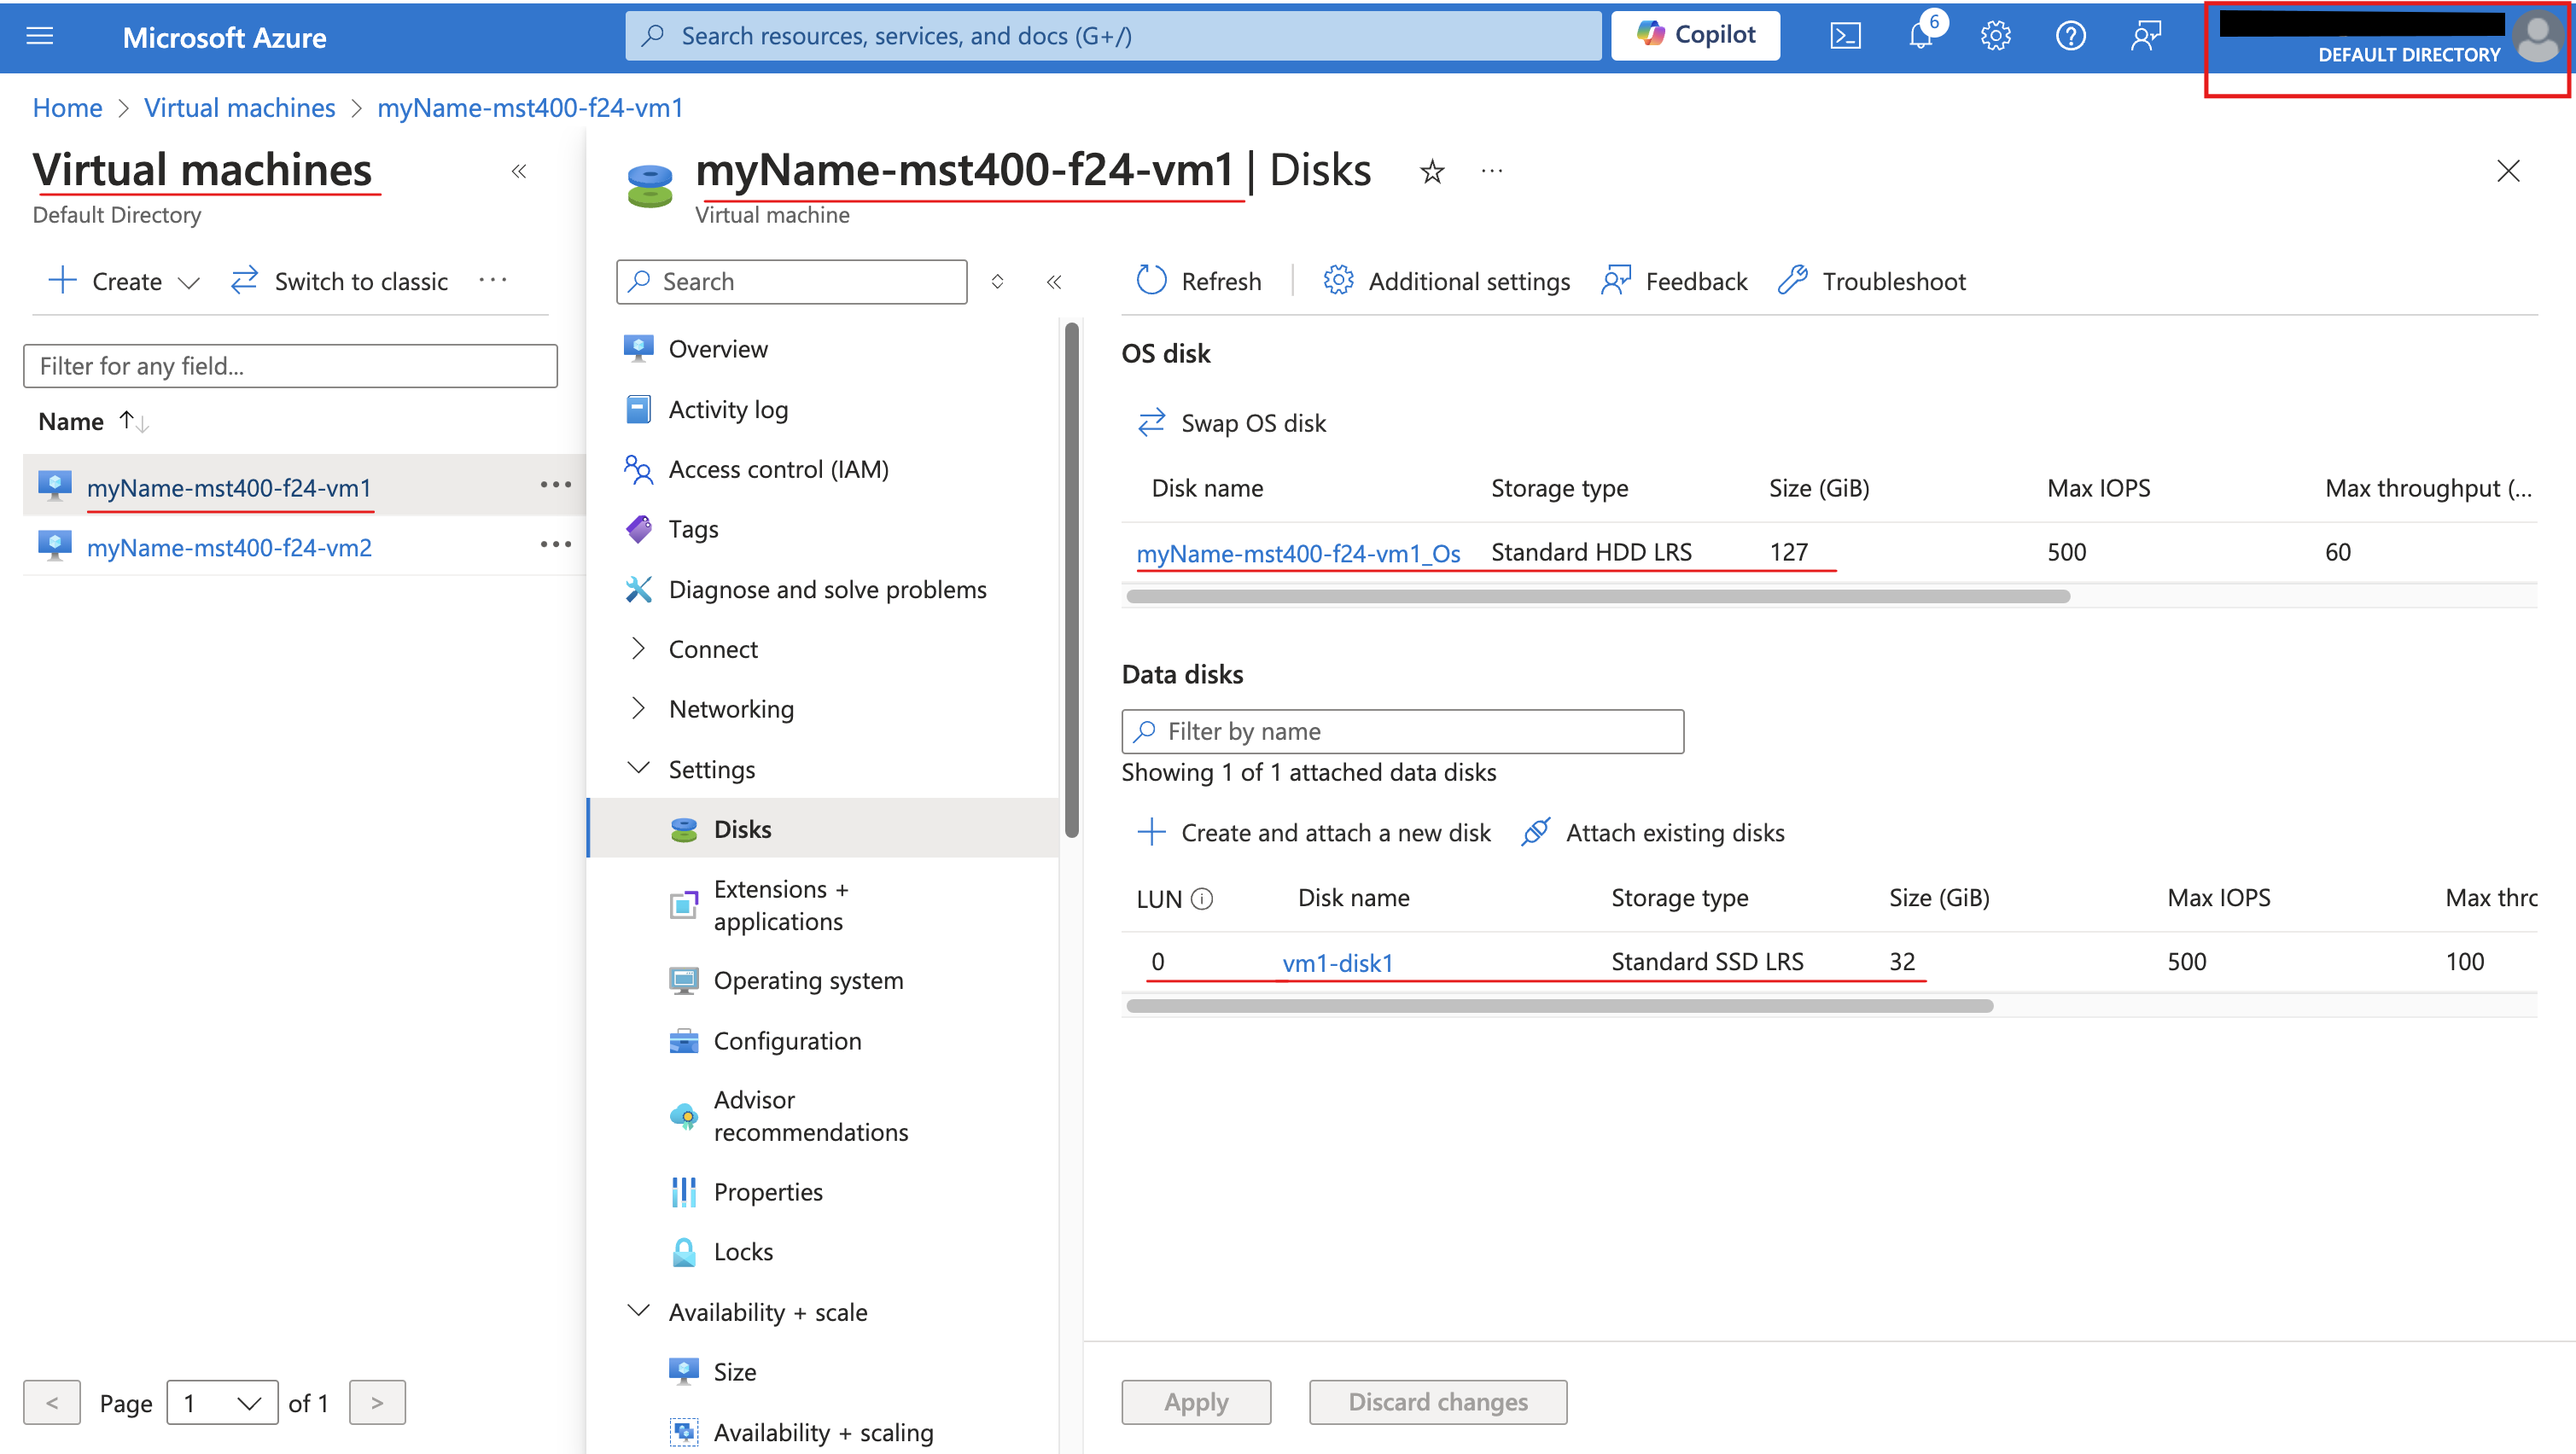
- Screenshot must show your Odl_user account, vm1 resized to Standard DS1_v2 and the vm1-disk1 data disk attached as Standard SSD (32 GiB)
Task 3: Create and configure Azure Virtual Machine Scale Sets 20 pts
In this task, you will deploy an Azure virtual machine scale set across availability zones. VM Scale Sets reduce the administrative overhead of automation by enabling you to configure metrics or conditions that allow the scale set to horizontally scale, scale in or scale out.
-
Setting Value Subscription the name of your Azure subscription Resource group <yourName>-clo800-F67-rgVirtual machine scale set name vmss1Region (US) East US Availability zone Zones 1, 2, 3 Orchestration mode Uniform Security type Standard Image Windows Server 2019 Datacenter - x64 Gen2 Run with Azure Spot discount Unchecked Size Standard D2s_v3 Username localadmin Password Provide a secure password Already have a Windows Server license? Unchecked -
Setting Value Name <yourName>-vmss-vnetAddress range 10.82.0.0/20(change what is there)Subnet name subnet0Subnet range 10.82.0.0/24 -
Setting Value Name <yourName>-vmss1-nsg -
Setting Value Source Any Source port ranges * Destination Any Service HTTP Action Allow Priority 1020 Name allow-http -
Setting Value Load balancing options Azure load balancer Select a load balancer Create a load balancer -
Setting Value Load balancer name <yourName>-vmss-lbNote: Pause for a minute and review what you done. At this point, you have configured the virtual machine scale set with disks and networking. In the network configuration you have created a network security group and allowed HTTP. You have also created a load balancer with a public IP address.
-
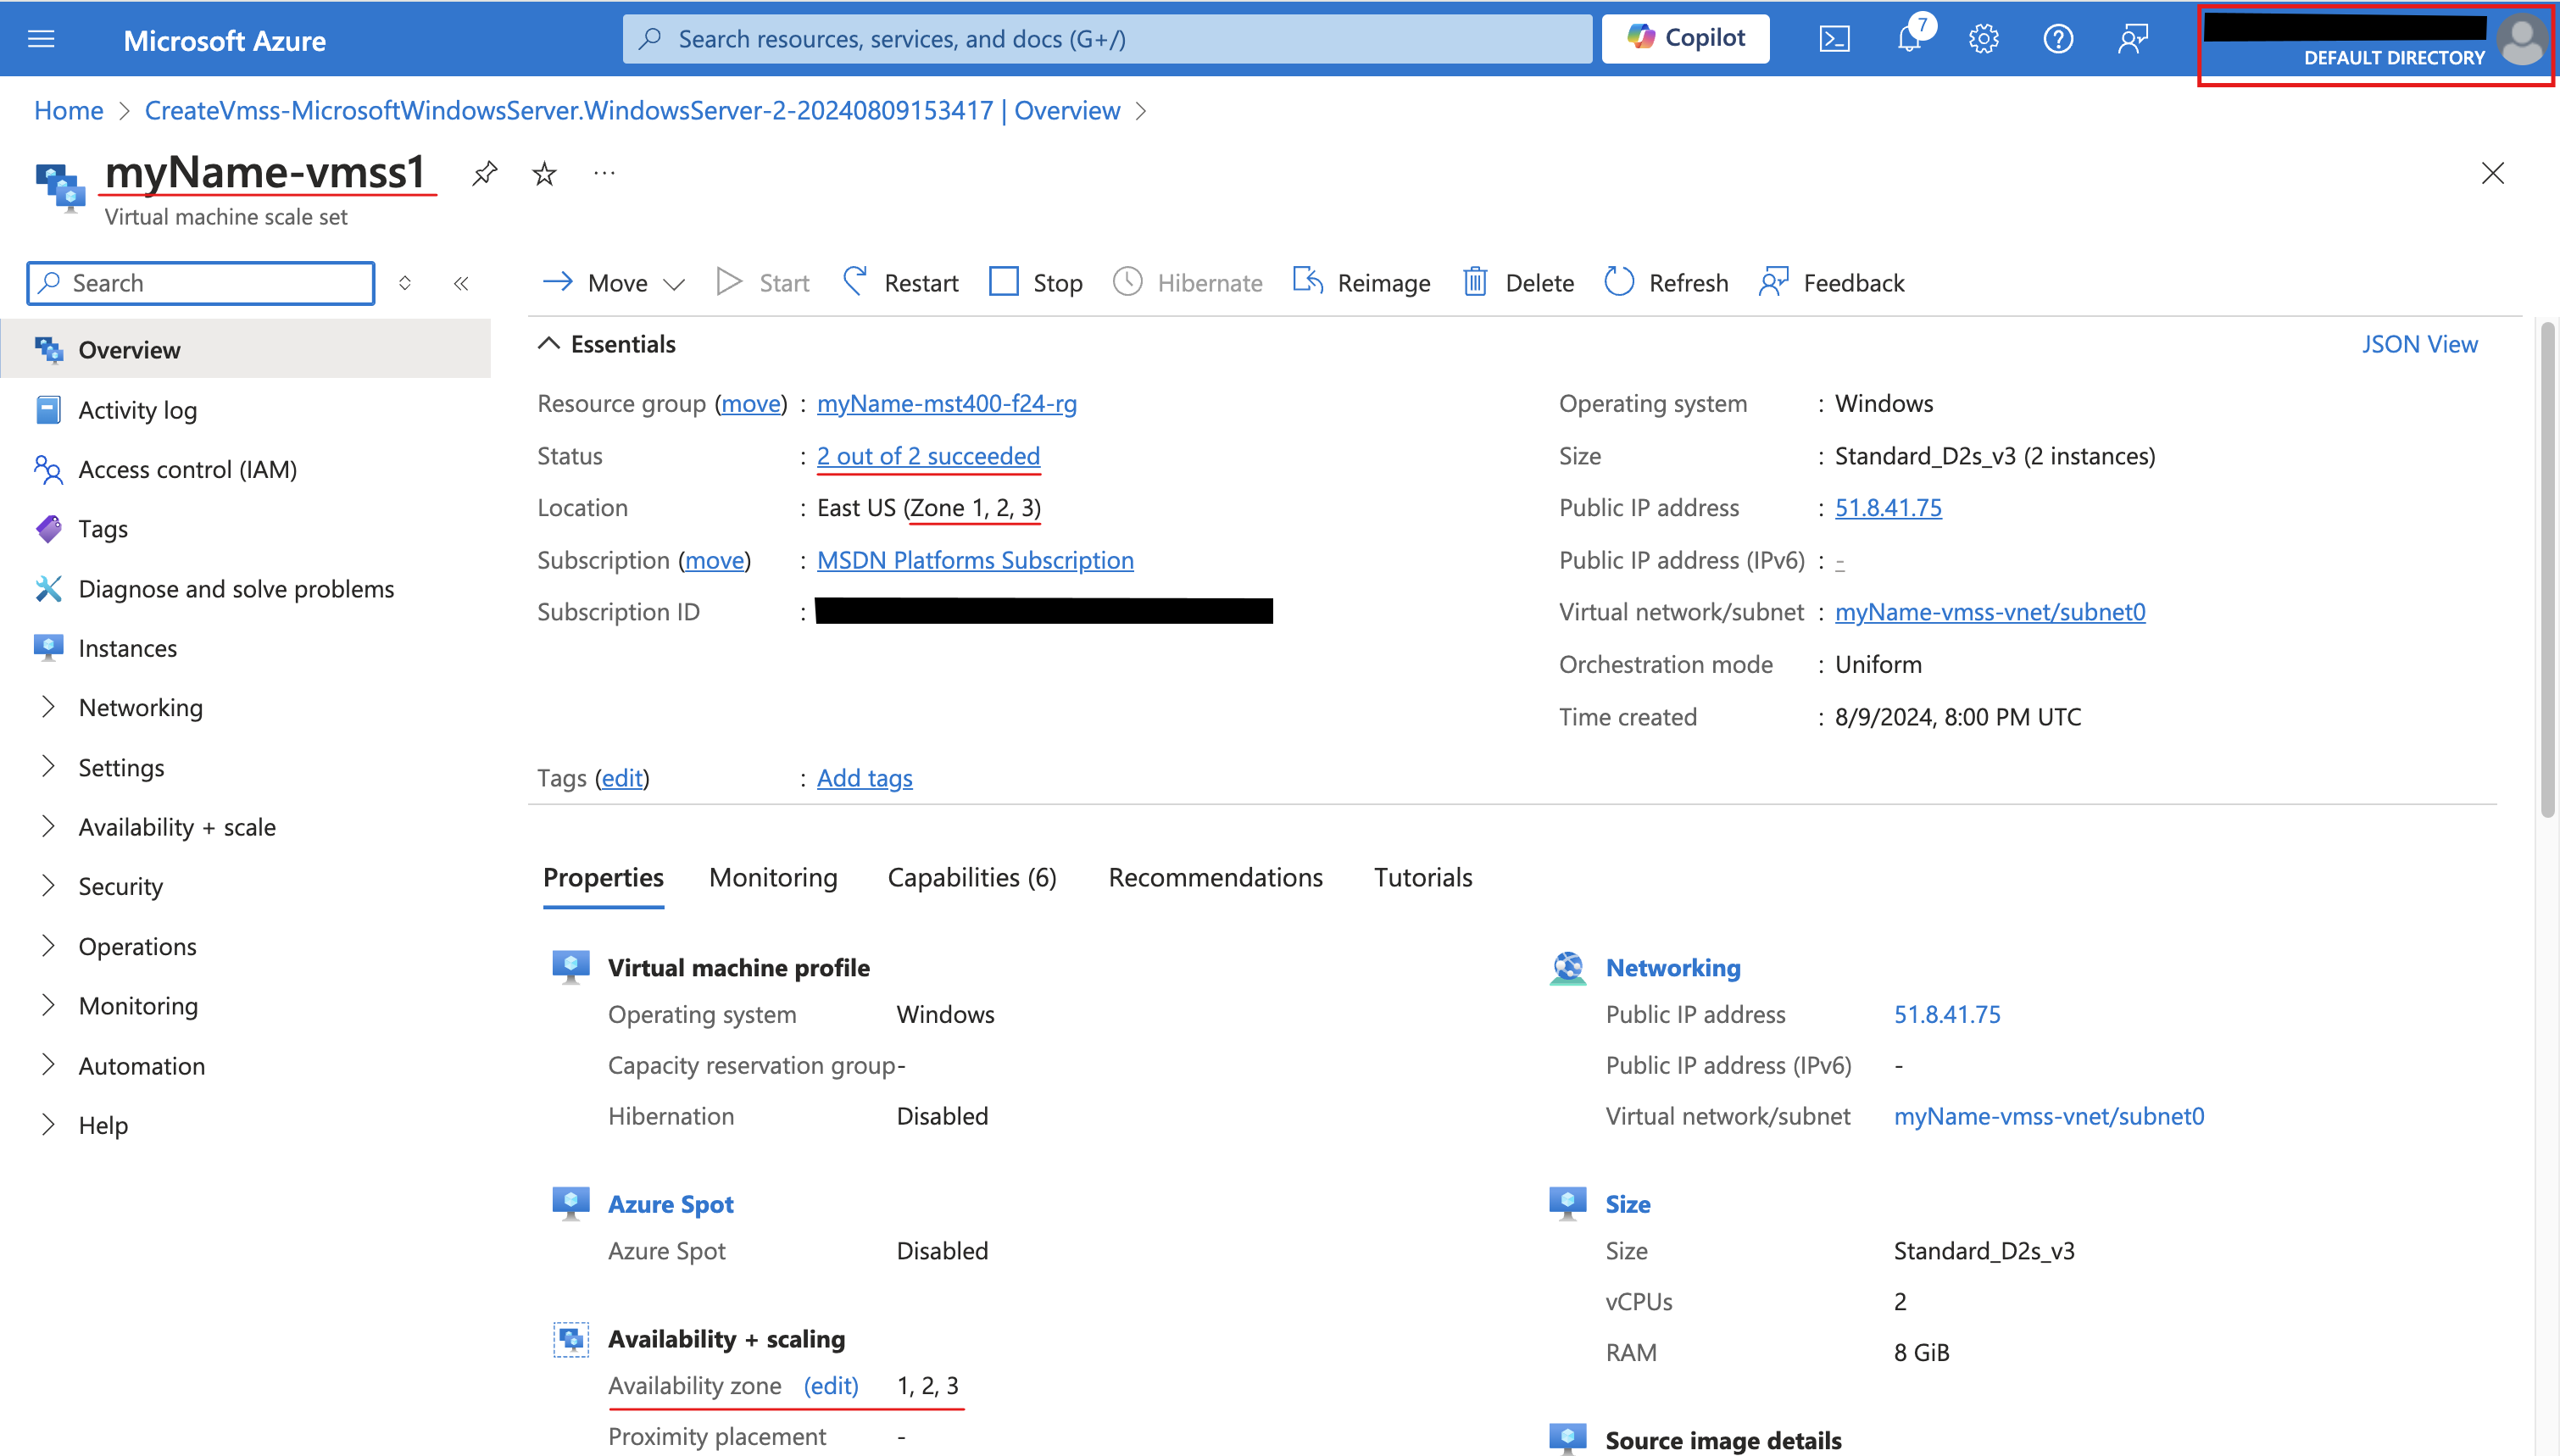
Setting Value Boot diagnostics Disable - Screenshot must show your Odl_user account, the completed vmss1 virtual machine scale set deployment
Task 4: Scale Azure Virtual Machine Scale Sets 30 pts
In this task, you scale the virtual machine scale set using a custom scale rule.
Scale out rule
-
Setting Value Metric source Current resource ( <yourName>-vmss1)Metric namespace Virtual Machine Host Metric name Percentage CPU (review your other choices) Operator Greater than Metric threshold to trigger scale action 10 Duration (minutes) 1 Time grain statistic Average Operation Increase count by (review other choices) Cool down (minutes) 1 Instance count 1
Scale in rule
-
Setting Value Operator Less than Threshold 10 Operation decrease count by Instance count 1
Set the instance limits
-
Setting Value Minimum 2 Maximum 6 Default 2 -
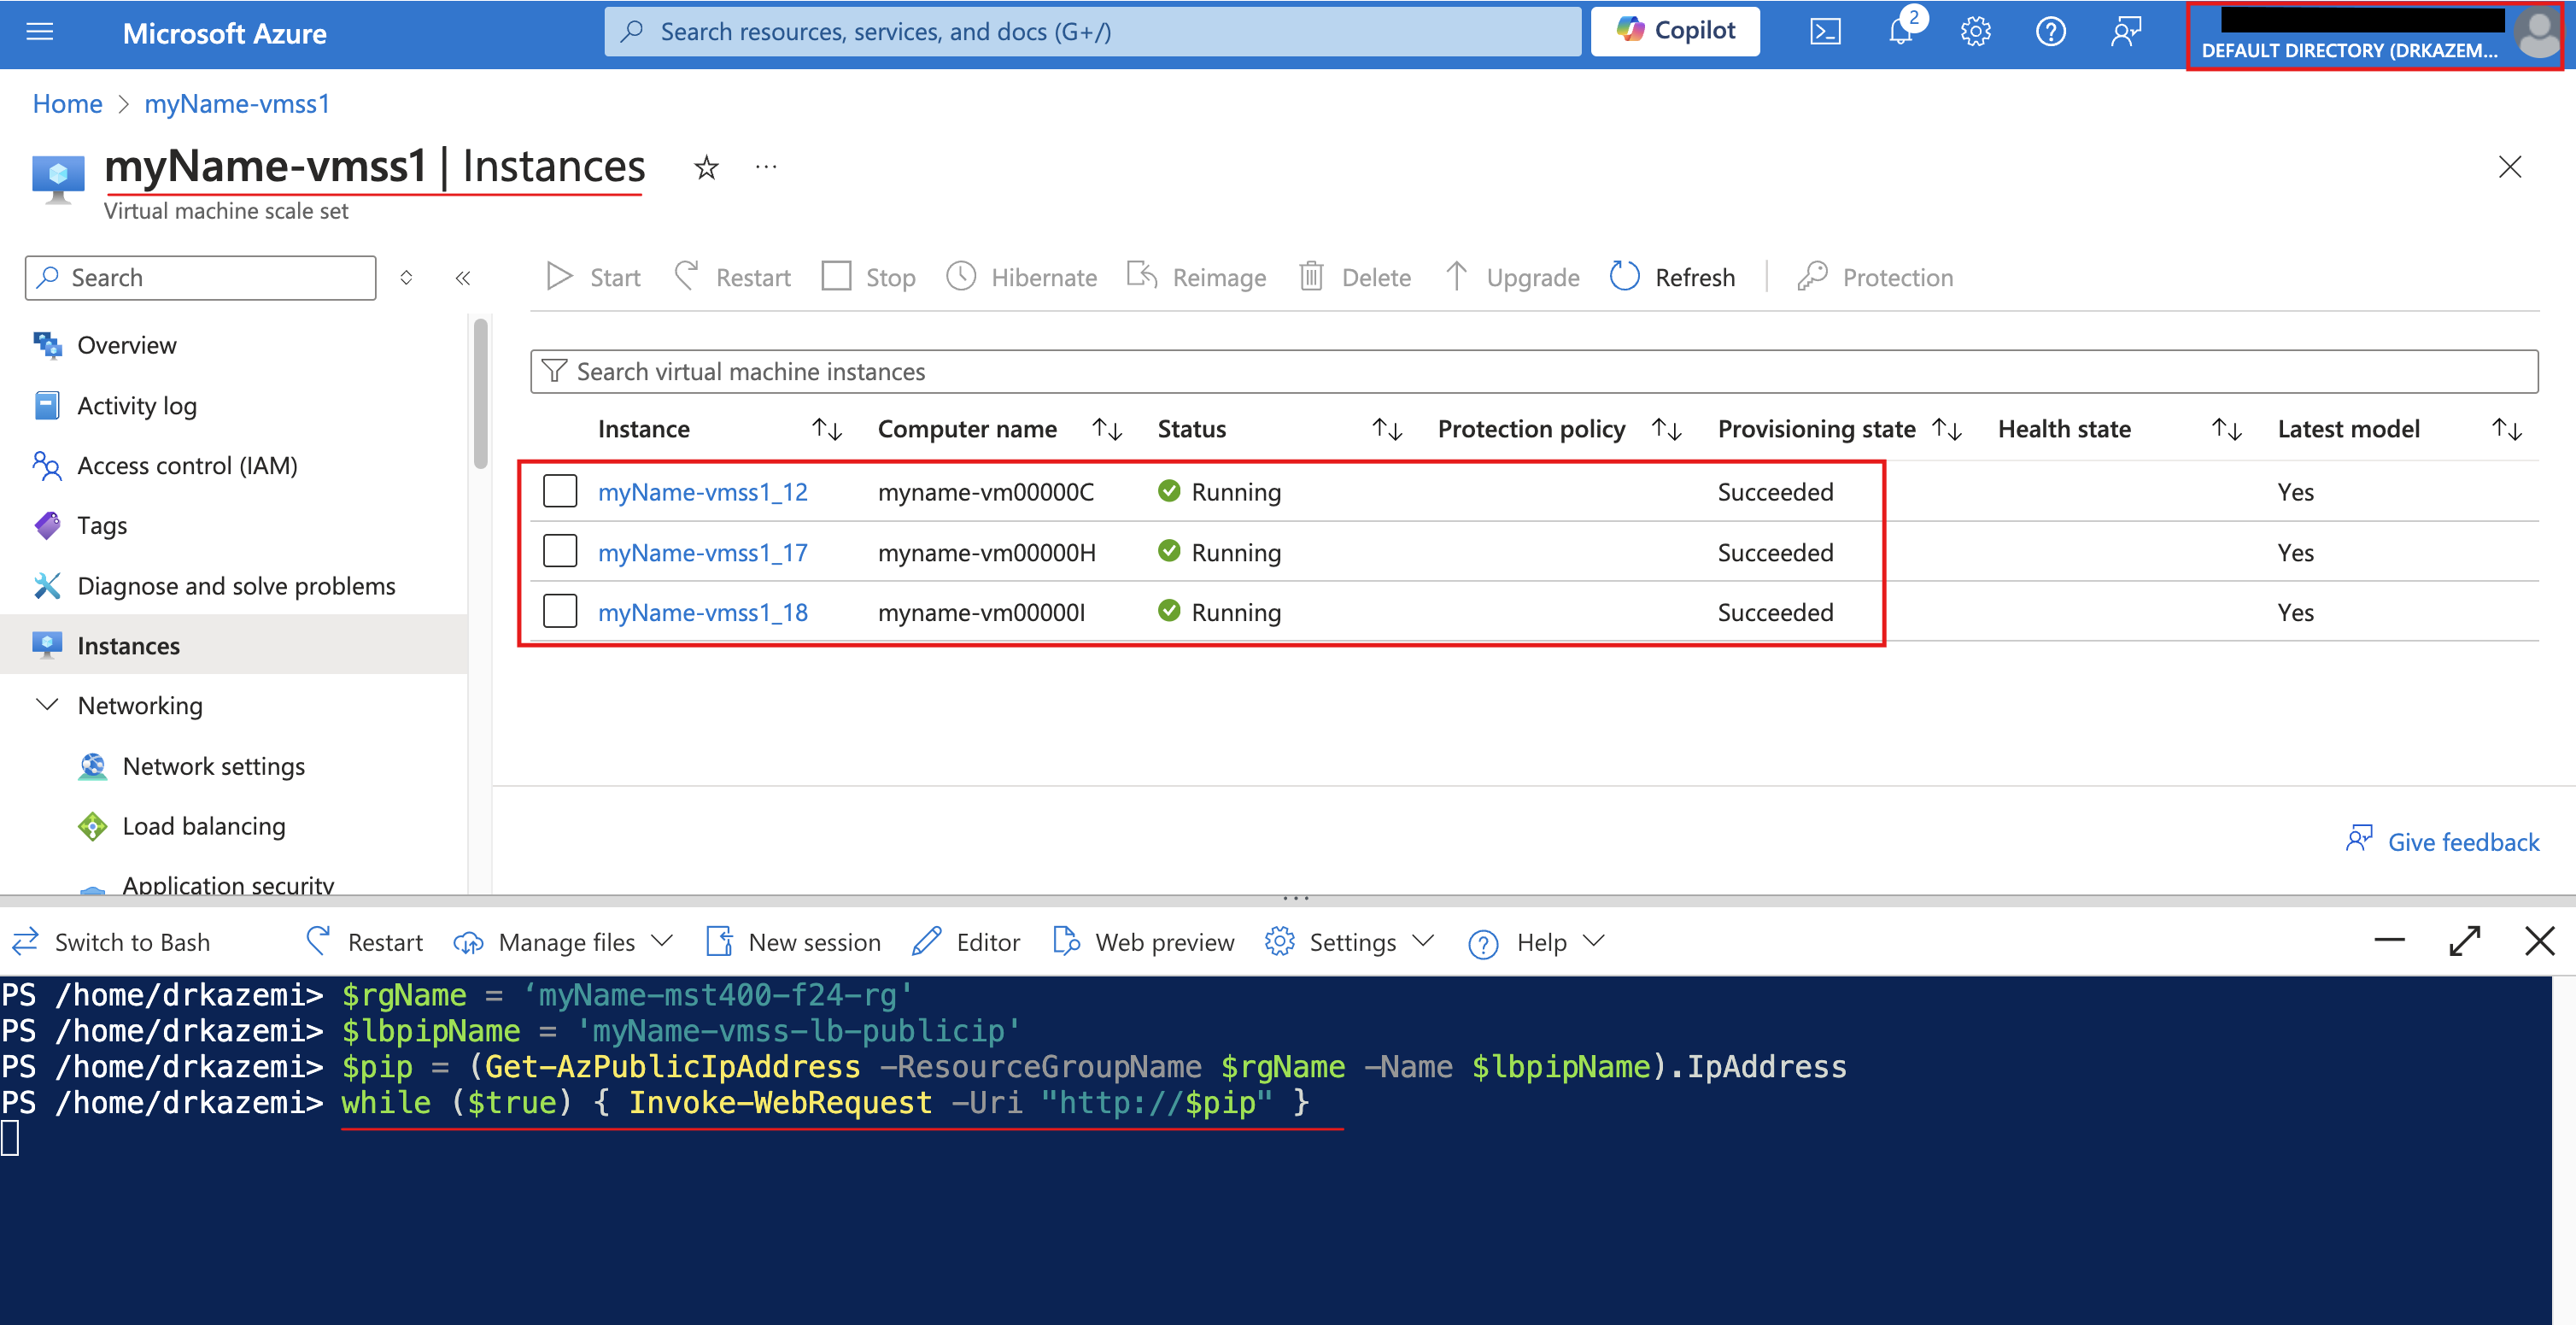
$rgName = '<yourName>-clo800-F67-rg' $lbpipName = '<yourName>-vmss-lb-publicip' $pip = (Get-AzPublicIpAddress -ResourceGroupName $rgName -Name $lbpipName).IpAddress while ($true) { Invoke-WebRequest -Uri "http://$pip" } - Screenshot must show your Odl_user account, the vmss1 Instances page with the scaled-out virtual machine instances
Task 5: Summary Questions & Review 20 pts
Minimum 2-3 sentences each — original thinking, your own words!
Sample screenshots reference
These are samples only. Your screenshots may vary, but they should include similar details underlined.
Clean up your resources
Remember to delete any Azure resources created for this lab after capturing all your information and screenshots. Removing unused resources ensures you will not have unexpected charges and helps you manage your Azure credit for the course. Delete all resource groups except the Odl-Seneca-lab default resource group.
Your submission preview
Screenshots you attach above and your Task 5 answers appear here. This is exactly what prints/exported as your PDF.
CLO800 Lab 05 - Cloud Computing options with Virtual Machines
Name: . Account: ·
Professor: Dr. Kazemi